

Ringbound Notebook
A ringbound notebook is a simple yet highly practical choice for everyday tasks. Its spiral binding allows pages to be removed cleanly, flipped through with ease, and laid completely flat, making it ideal for sketching, note-taking, and general daily use.
Why choose a ringbound notebook?
Ringbound notebooks allow you to mix paper stocks and add additional inserts without limitations. Because it is not formed using a traditional book block, it is highly customisable and flexible in design. For instance, you can choose to add in contrasting gloss pages or even fully printed foldouts to create internal ‘chapters’ without having to consider page counts. While a traditional notebook is limited to a page count in the multiples of eight, a ringbound only needs to be divisible by 2.
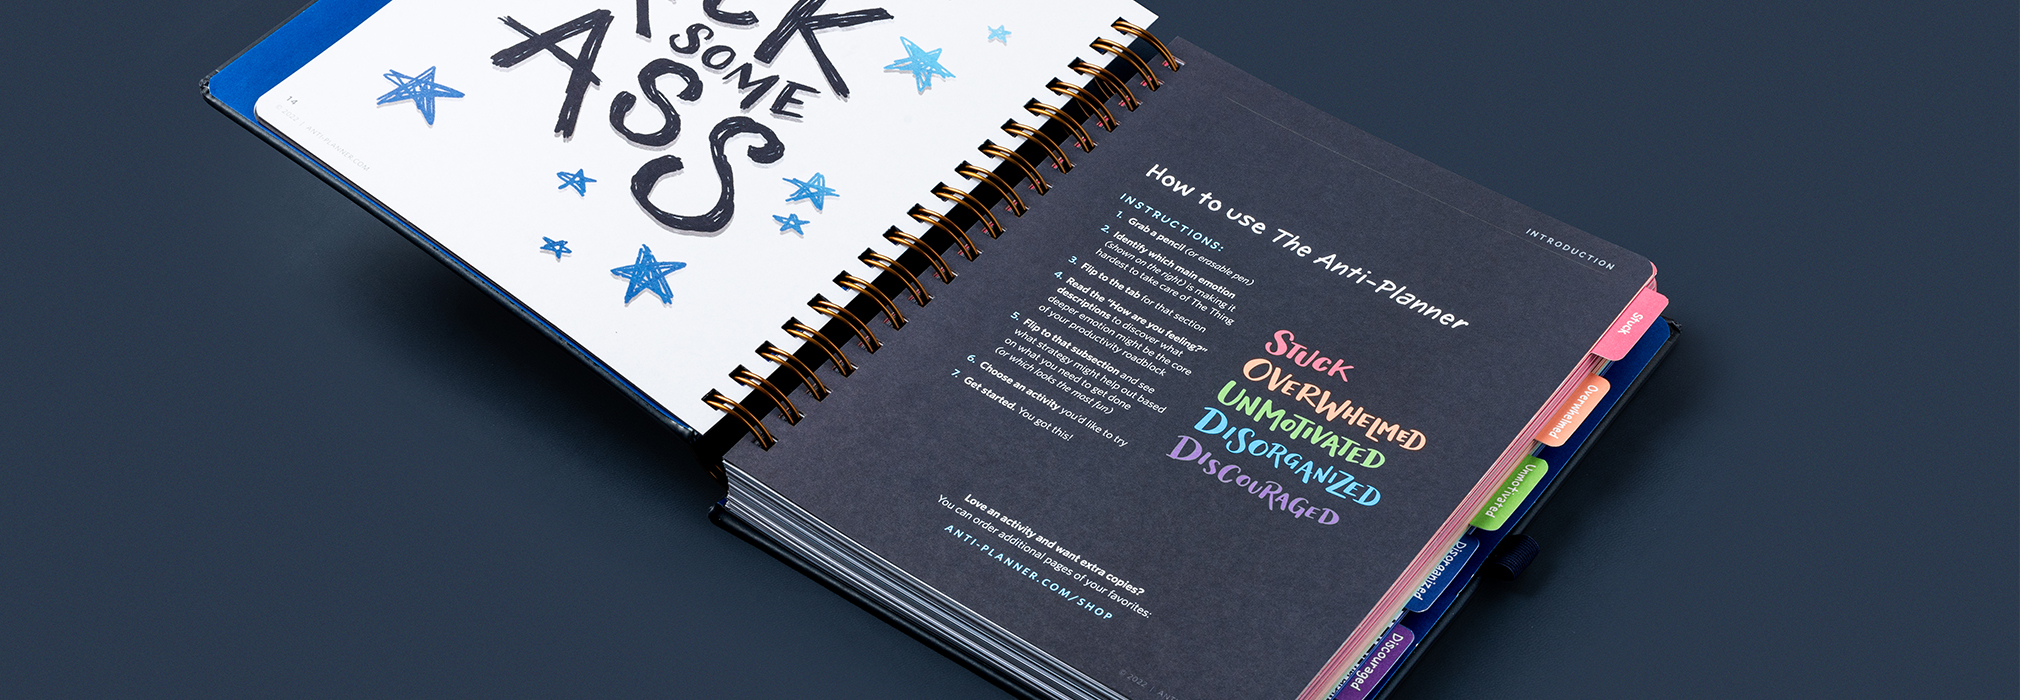
Ringbound notebook with tab indexing
Notebook Cover
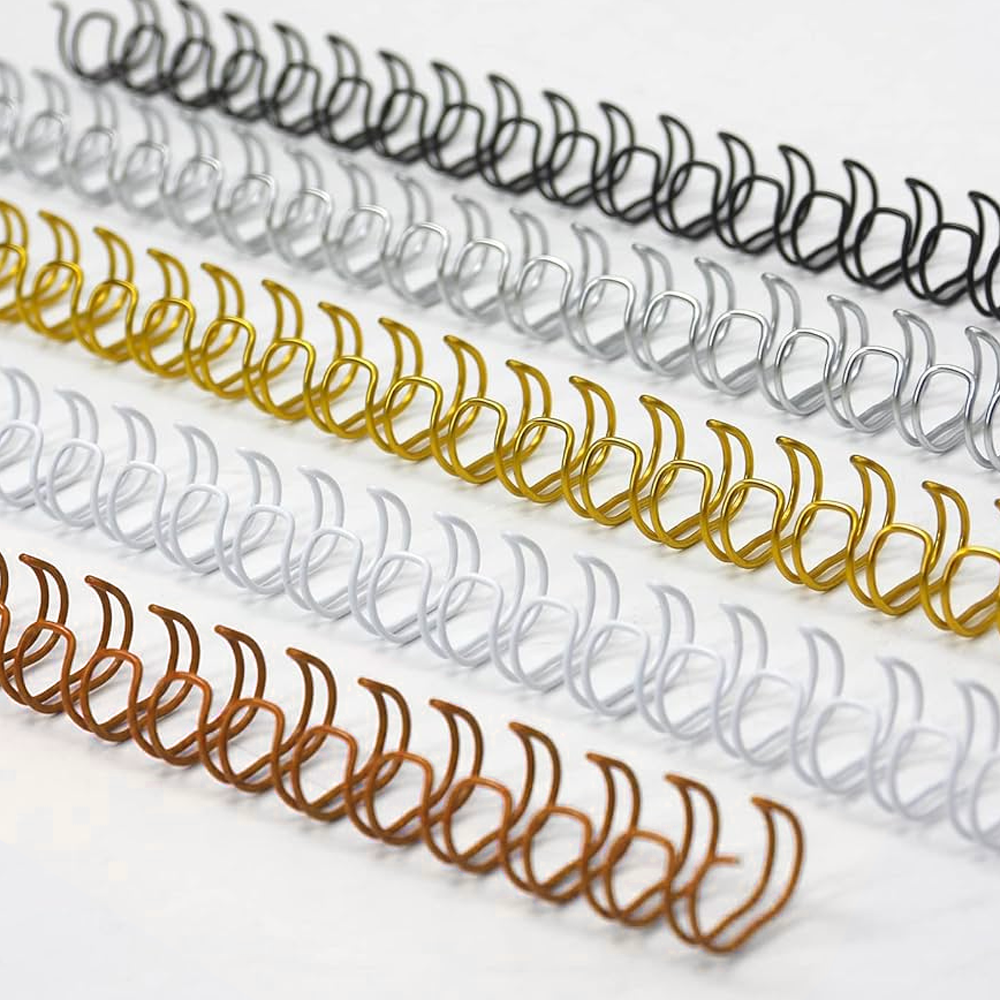
Ringbound notebook covers follow many of the same design principles as hardbound notebooks and can be created using a wide range of materials, including printed paper, cloth, faux leather, and more. Each material offers different aesthetic and durability benefits, allowing you to tailor the notebook to its intended use and style. Part of the ringbound charm is also its ability to offer a range of wire colours, allowing you to emphasise elements of your cover design and give it an overall more cohesive feel. As standard we offer black, white, gold, silver and copper wire.
When designing the cover, it’s essential to account for the 10 mm gutter (the space required for hole punching). No artwork or important design elements should extend into this area, as they may be cut off or distorted during production.
Tip: To keep your layout properly centered, subtract or mark out the 10 mm gutter from your total workspace. Use the remaining area as your active design space to ensure all elements are positioned correctly and remain visually balanced once the holes are punched.
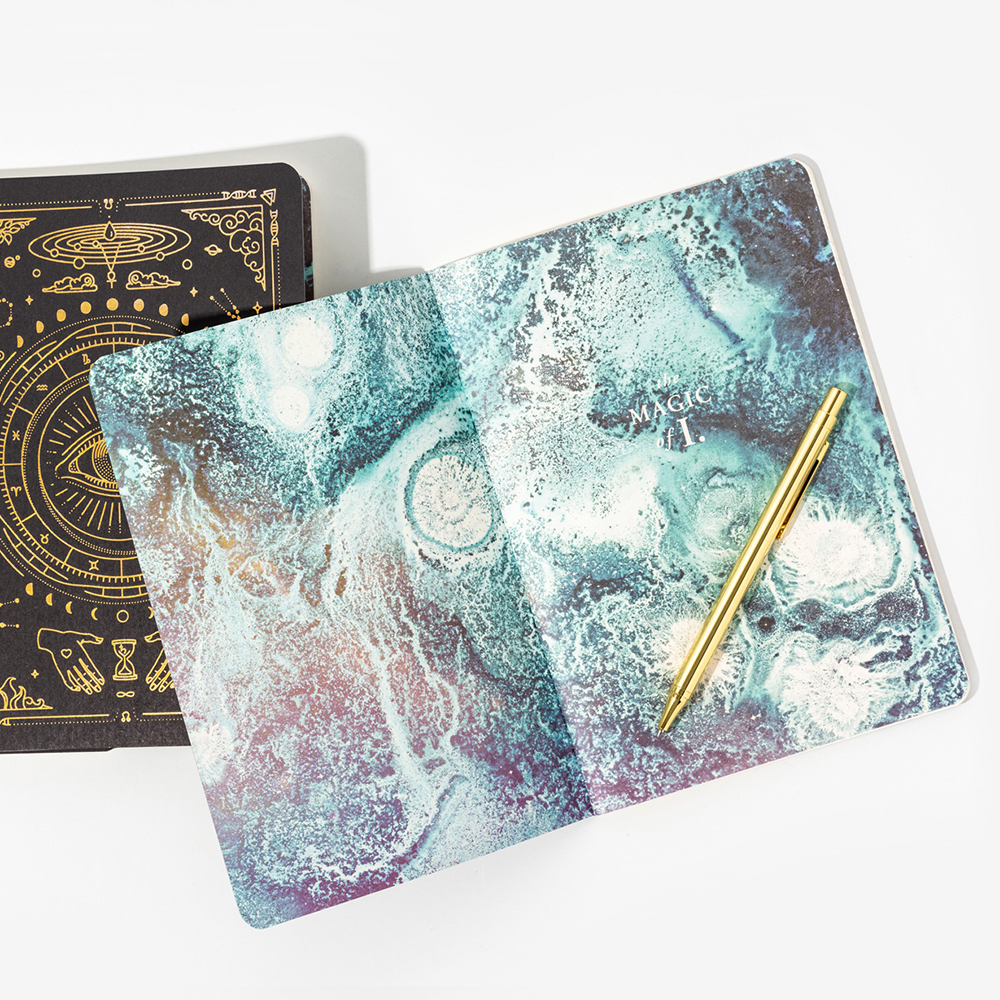
Endpapers
Endpapers serve a slightly different purpose in ringbound notebooks compared to traditional casebound books. In hardbound books, endpapers help attach the book block to the cover. In ringbound notebooks, the binding mechanism does the structural work, so endpapers are mainly decorative or functional rather than structural.
In traditional hardbound books the endpaper would line the inside of the cover and form the first two pages of a notebook. However for a ringbound notebook you can simply line just the inside of the cover and start your book block from page one.
Endpapers on a hardbound notebook

Endpapers on a ringbound notebook
The Gutter
Ring binding requires extra inner spacing so that punched holes do not interfere with content. This extra space is what we call the ‘gutter.’ All ringbound pages require a 10mm gutter which should be accounted for on the inside margin of the pages i.e. the first page on the left. Second page on the right hand side.
Before setting up your print document you need to choose if you’d prefer which notebook size you’d prefer, Slim or Full size.

Slim notebook measurements (A5 example)
Full notebook measurements (A5 example)
Option 1. Slim:
Keep the overall notebook a standard size with smaller page size (A6, A5, A4) and have the inner page area 10mm smaller.
What this means:
- The outer cover remains exactly A6, A5, A4, etc.
- The inner pages are reduced by about 10 mm to account for the binding/gutter.
- Inner pages will not be a standard paper size anymore.
Pros
- The overall notebook fits standard shelves, bags and accessories.
- Artwork setup is simpler.
- Good for customers who care about the notebook fitting a standard size.
Cons
- The inner pages are non-standard dimensions, which will need to be considered while designing any printed pages.
- Reduced overall writing area.
Option 2. Full size:
Add a 10mm gutter to the standard notebook size so the inner pages are exactly A5 (or other standard sizes), making the overall notebook slightly larger.
What this means
- Inner pages remain exact A5.
- The outer cover becomes A5 + 10 mm (or whatever gutter you add).
- The full notebook is slightly larger than the standard format.
Pros
- The inner pages remain true A5, which users may prefer for consistency.
- Professional look and feel, especially for planners, journals, or notebooks where page size matters.
Cons
- The notebook will no longer match standard external dimensions (slightly oversize).
- It may not fit some A5 cases, sleeves, or accessories.
- Can look visually “off-size” next to standard notebooks.
Setting up your files for a slim size:
To set your file up for a slim notebook you need to open InDesign and create a new file. In this window click ‘print’ which will bring up template options for print files and select your page size. In this example we’re using A5 but the same settings apply to whatever notebook size you choose. Then navigate to the right hand side panel and adjust the settings as follows:
Orientation: Ensure to tick ‘facing pages’ so that the gutter (margins) area is repeated correctly.
Margins: top 0, bottom 0, inside 10mm, outside 0. Ensure the link symbol is unticked so that you can set a value for just a single area rather than repeating the same settings for all areas.
Bleed: top 5mm, bottom 5mm, inside 5mm, outside 5mm. Ensure the link symbol is ticked so that a single value is repeated for all areas.
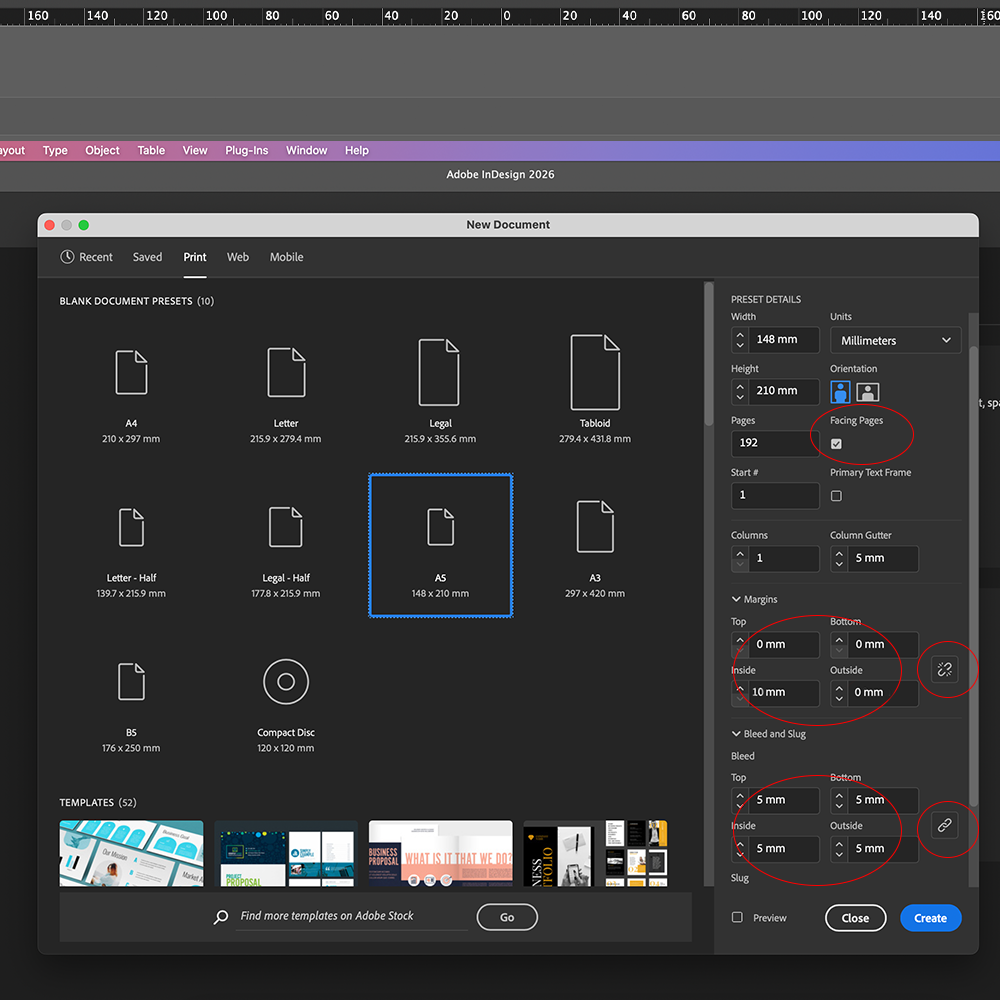
Slim notebooks must be set up to 148 mm x 210 mm

Understanding the gutter size and placement
Setting up your files for full size:
To set your file up for a standard A5 notebook you need to open InDesign and create a new file. In this window click ‘print’ which will bring up template options for print files and select your page size, in this example we’re using A5 but the same setting applies to whatever notebook size you choose. Then navigate to the right hand side panel and adjust the settings as follows:
Width: Increase the width by 10mm, changing it from 148mm for a standard A5 to 158mm.
Orientation: Ensure to tick ‘facing pages’ so that the gutter (margins) area is repeated correctly.
Margins: top 0, bottom 0, inside 10mm, outside 0. Ensure the link symbol is unticked so that you can set a value for just a single area rather than repeating the same settings for all areas.
Bleed: top 5mm, bottom 5mm, inside 5mm, outside 5mm. Ensure the link symbol is ticked so that a single value is repeated for all areas.
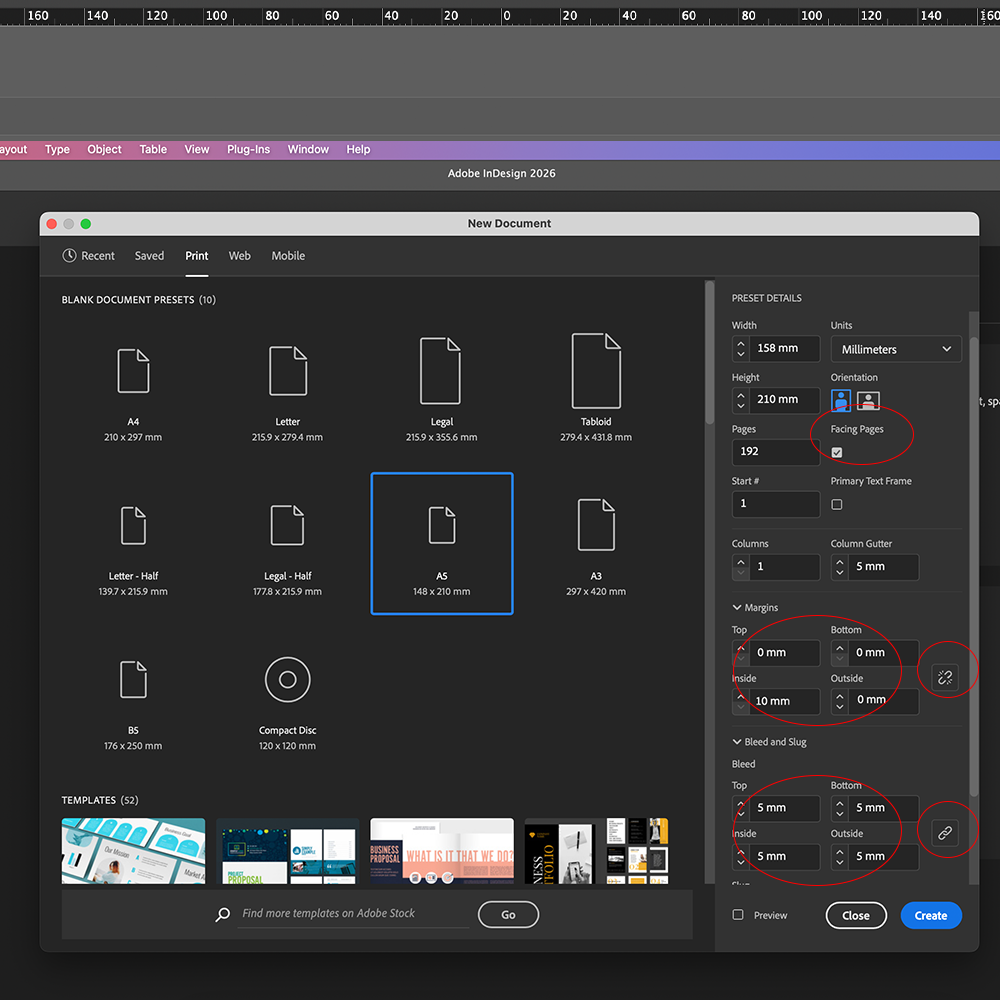
Slim notebooks must be set up to 158 mm x 210 mm
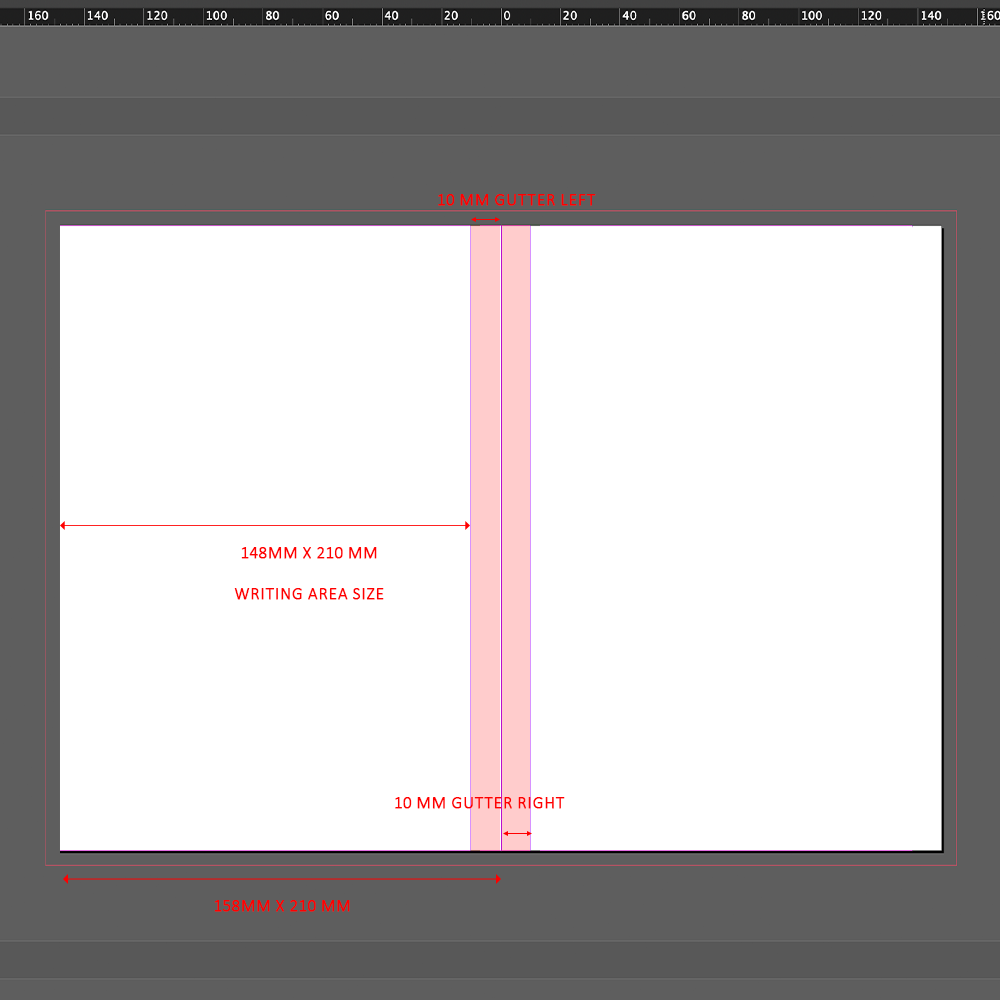
Understanding the gutter size and placement
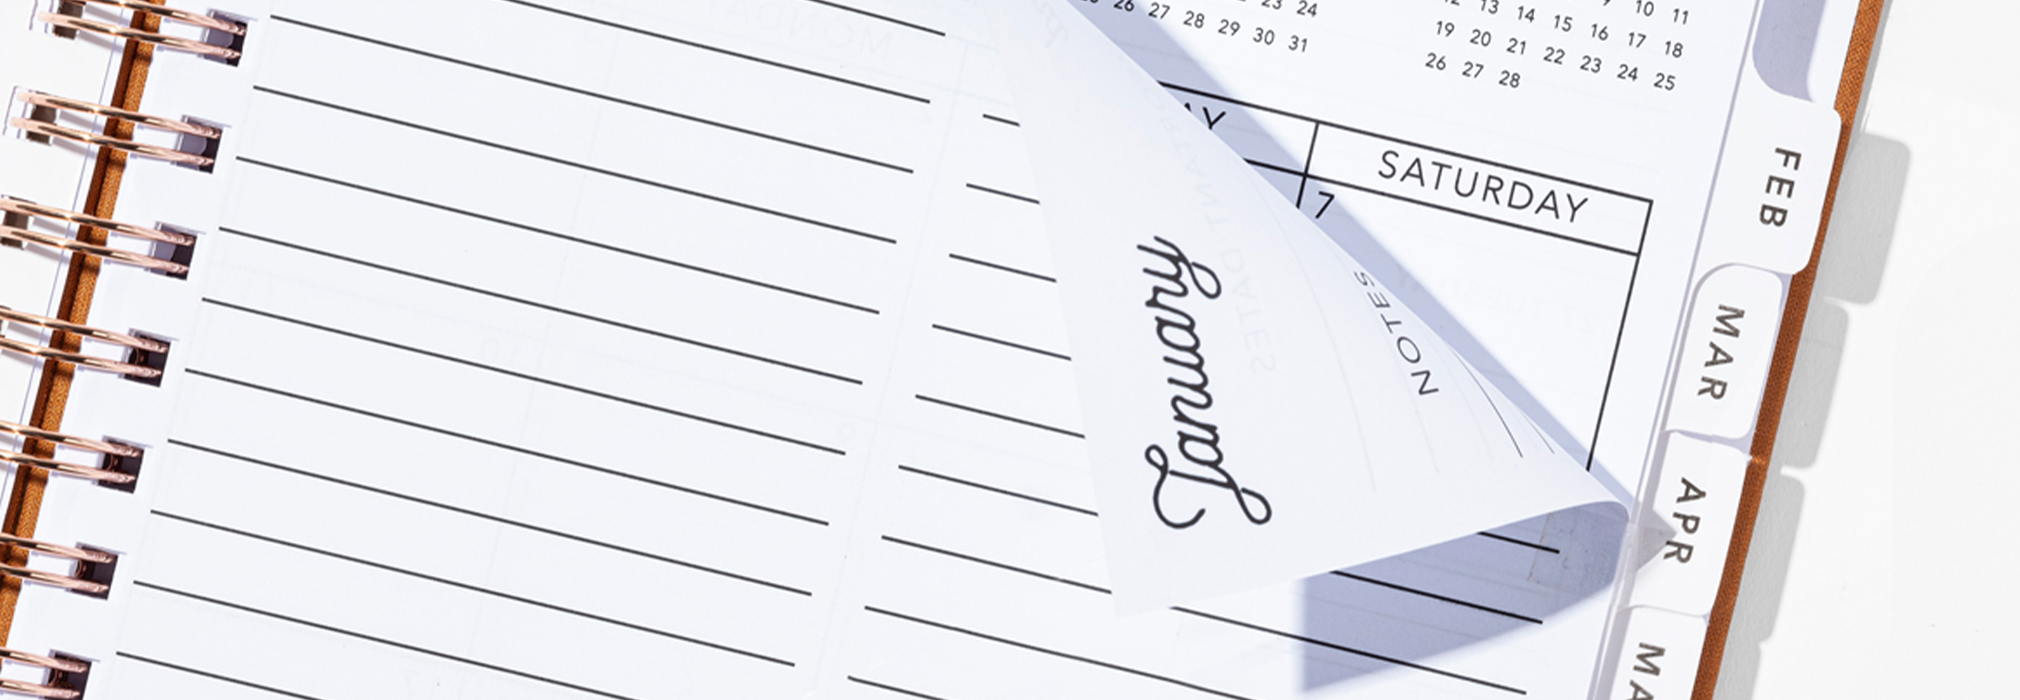
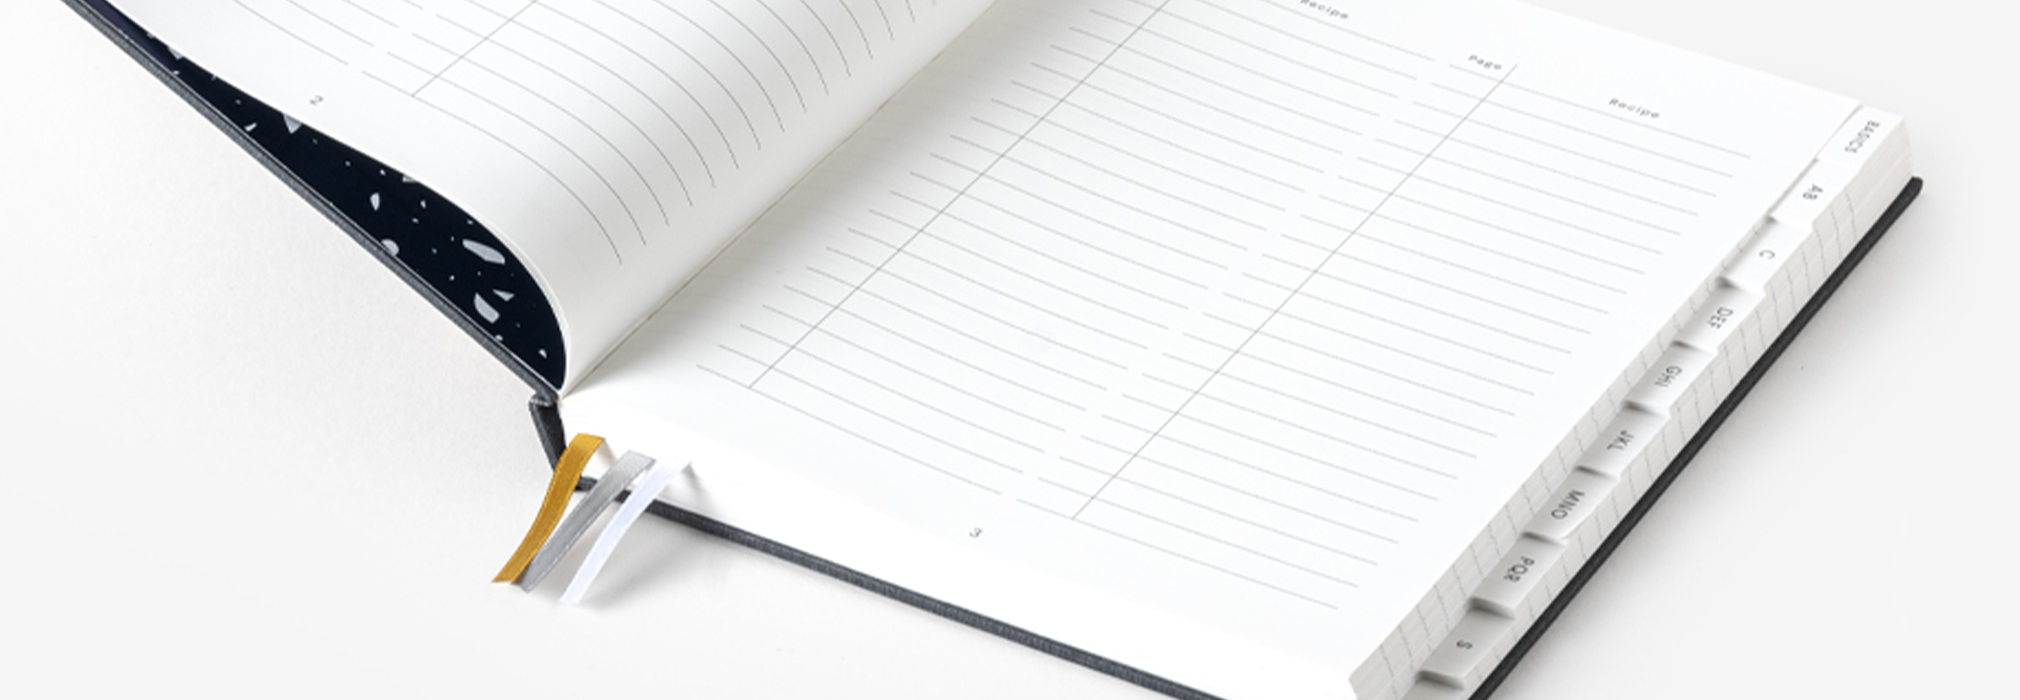
Adding Tab or Step Indexing to your ringbound notebook.
Indexing is a customisation style that allows you to divide your notebook into dedicated sections by adding easily accessible tabs with information on them. By including indexing within your journal you can easily separate it into relevant categories to make it easier for users to navigate. This is a customisation often seen within planners. We can offer two styles of indexing; Tab Indexing and Step indexing.
Tab Indexing
Tab indexing (+10mm)
Tab indexing is a style that features a single tab on the side of the notebook, with the same size single tab repeated for each section. Please note that tab indexing is available for ring bound notebooks only.
For tab indexing you will need to allocate an additional 10mm width for your tabs. For a detailed step by step tutorial on how to add tab indexing markers to your file click here.
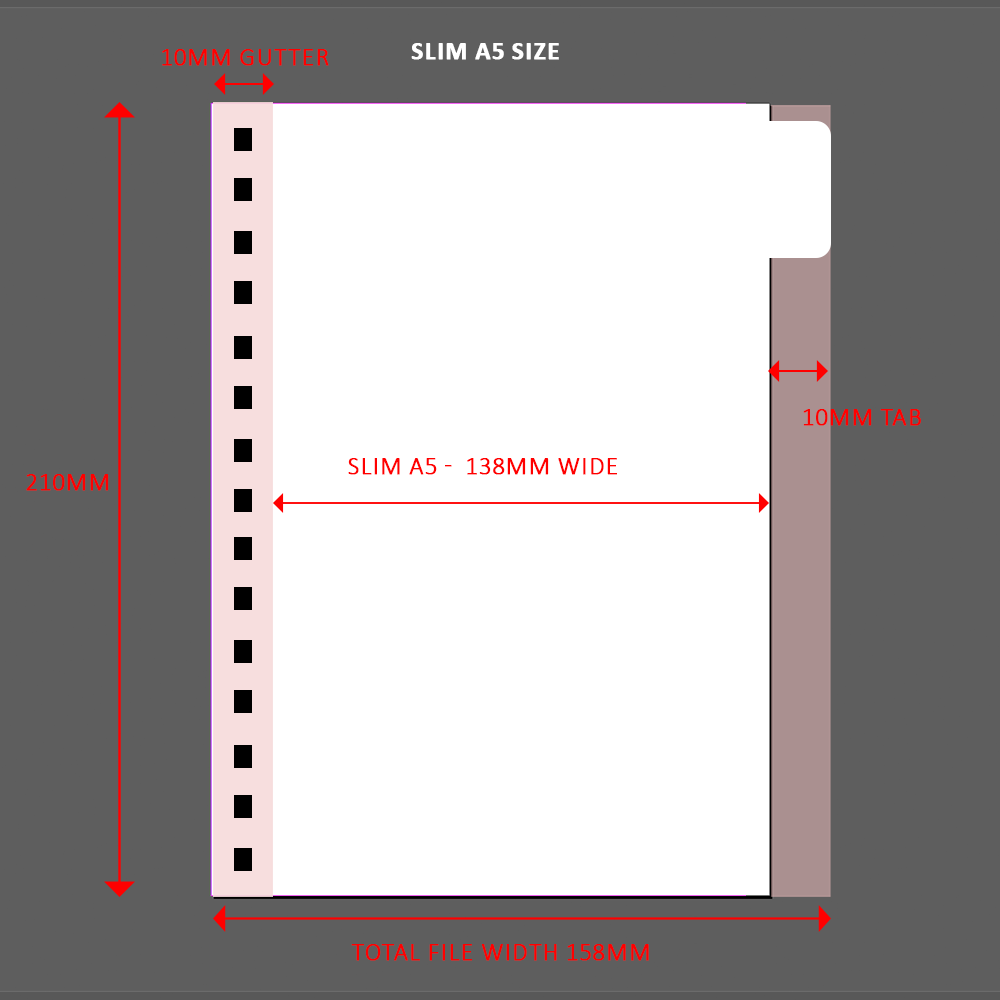
A slim A5: 148mm (A5 size) – 10mm (gutter) + 10mm (tabs) making your overall size 158mm x 210mm.
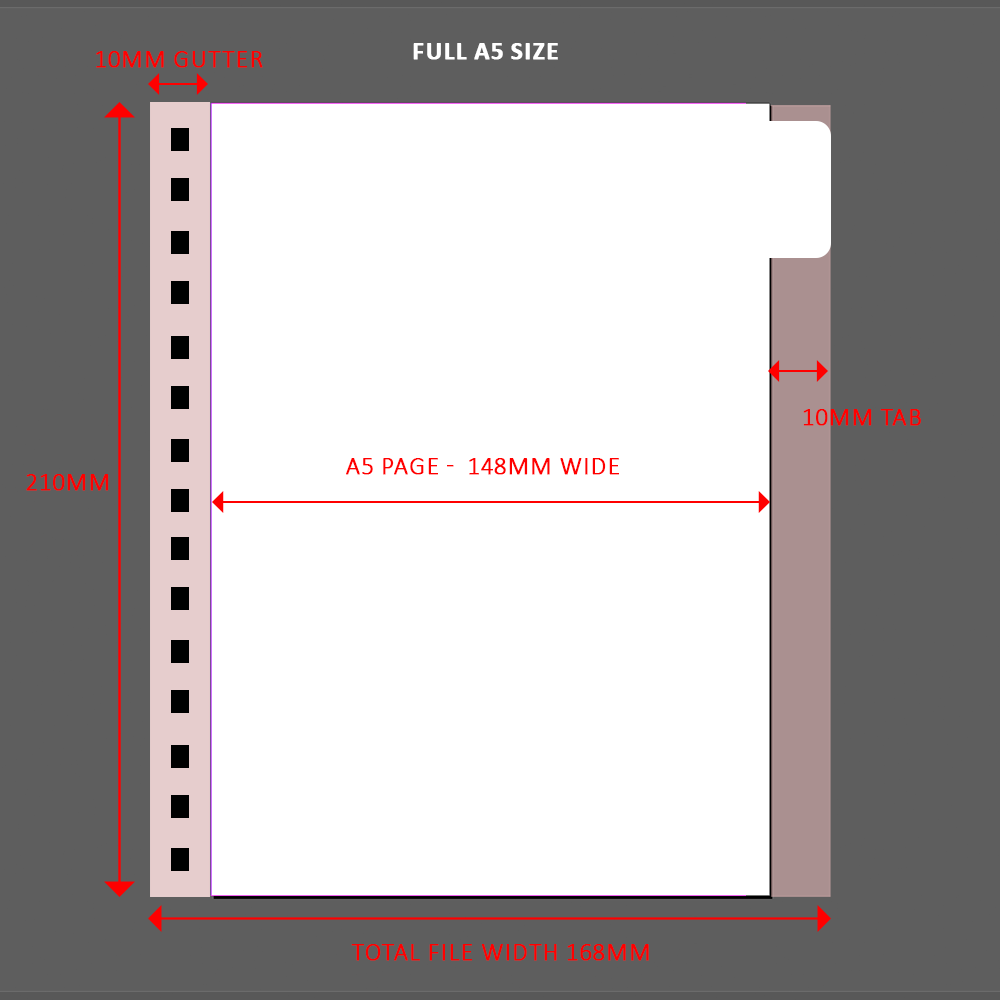
A full A5 size: 148mm (A5 size) + 10mm (gutter) + 10mm (tabs) making your overall size 168mm x 210mm.
Step Indexing
Step indexing (-10mm)
Step indexingis a style that features incremental steps where less and less tab space is cut away from the pages, leaving the tabs all stacked and resembling steps. For instance, the first section of the notebook will have only a single tab on the side but the very last section will be a full sized page with no cut aways.
For step indexing in a ringbound notebook you will need to allocate 10mm tab width from your existing page size. For a detailed step by step tutorial on how to add tab indexing markers to your file click here.
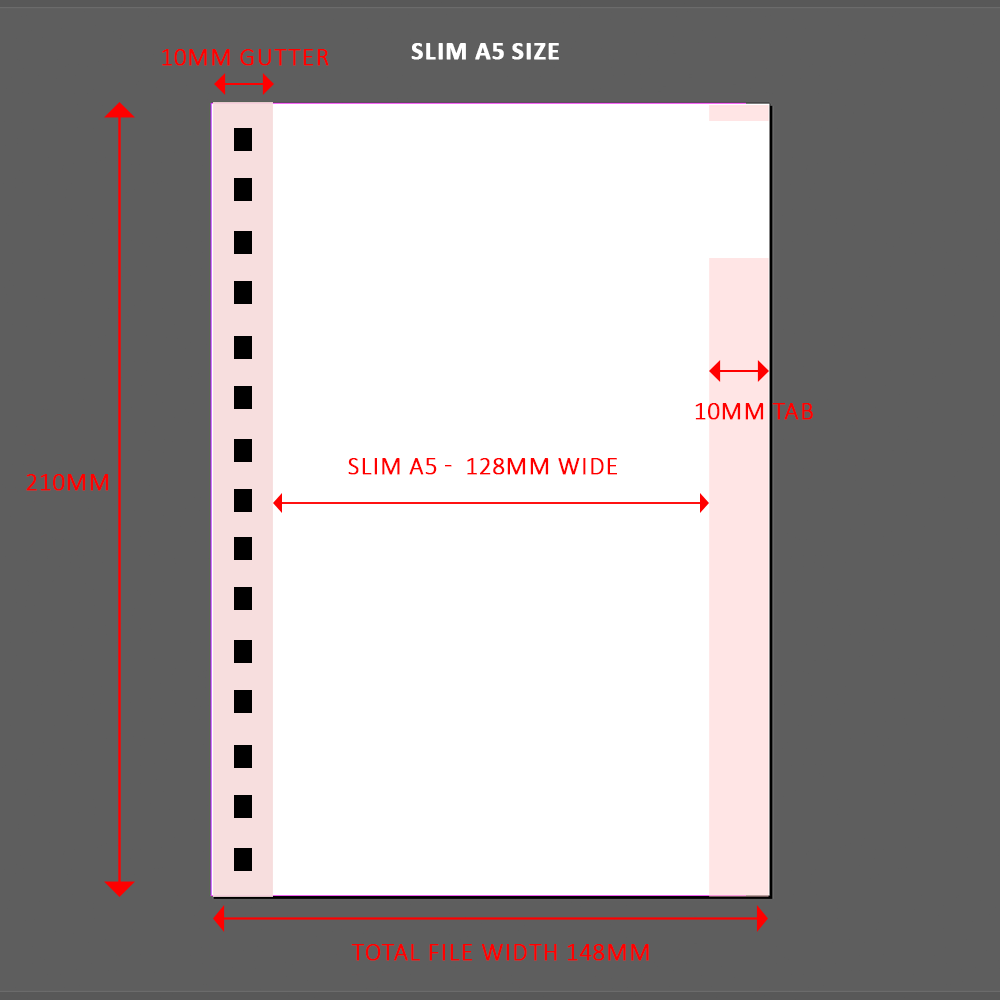
A slim A5: 148mm (A5 size) – 10mm (gutter) – 10mm (tabs) making your overall size 158mm x 210mm. Please note this will leave you with a 128mm x 210mm writing area which is smaller than a standard A5.

A full A5 size: 148mm (A5 size) + 10mm (gutter) – 10mm (tabs) making your overall size 158mm x 210mm. Please note this will leave you with a 138mm x 210mm writing area which is smaller than a standard A5.
Things to note:
For projects featuring more than 250 pages we will need to allocate extra spacing, our team will be able to assist on this.
It is important to note that the tab pages on a ringbound book are different stock to the standard pages and can be laminated and foiled if required. We suggest using 240gsm card for all tabs on ringbound books. This is important to remember in laying out artwork and single colour or two colour printing.
For cover artwork we recommend that logos/ designs that need to be centred are provided as different layers within your artwork file for slight adjustments.

Checklist Before Submitting Artwork
- Page size matches final trim
- 5mm bleed on all sides
- 10mm gutter margin applied correctly
- All content is placed within safe area
- Tabs sized and labelled correctly
- PDF is setup in CMYK colours
- Text is outlined or fonts embedded
- Press-ready PDF exported
- Full Page count is divisible by 2